Chilli con carne

Here is a proper recipe for chilli con carne: ‘proper’ not necessarily because it’s authentic but because it takes time, uses good quality ingredients and avoids the convenient shortcuts (tinned beans, minced meat) that make chilli such a popular meal with students. You need to plan ahead, soaking the beans overnight and setting aside enough time to chop the meat by hand. My recipe for both the chilli and the avocado salsa – a contrasting cold garnish added at the end – is based on Delia Smith’s version in her Winter Collection (1995).

Serves 6 

Ingredients

500g braising steak, cut into very small pieces
250g black beans
40g fresh coriander (leaves reserved for salsa)
4 tbsp olive oil
2 large onions
2 garlic cloves, minced or crushed
2 large green chillies, de-seeded (or not) and chopped small
1 tbsp plain flour
2 tins chopped tomatoes + ½ tin water
2 large red peppers
1 lime, juiced
Salt

For the salsa

3 large, firm tomatoes
2 ripe, firm avocadoes
1 small red onion, finely chopped
Reserved chopped coriander leaves
1 lime, juiced
1 red chilli, finely chopped
A few drops of Tabasco sauce
Salt and pepper

To serve

6 tbsp crème fraîche

You will also need a large oven-proof casserole with a lid.

Method

Cover the beans with water and soak them overnight. When you’re ready to start cooking, pre-heat the oven to 140 fan.

Strip the leaves off the coriander stalks and set aside. Chop the stalks very finely. Heat 2 tbsp oil in the casserole and cook the onions, garlic, coriander stalks and chillies gently for about 5 minutes. Transfer to a plate, add the rest of the oil to the casserole, turn the heat up high and brown the meat in two or three batches. Return everything to the casserole and sprinkle in the flour, stir it in to soak up the juices, then add the drained beans, followed by the tomatoes + water. Stir well and bring up to simmering point. Don’t add any salt at this stage (it prevents the beans from softening) – just put the lid on and transfer the casserole to the oven to cook for an initial 1½ hours.

Towards the end of that time, de-seed and chop the peppers into smallish pieces. Stir into the meat and beans and return it all to the oven for a further 30 minutes’ cooking.

To make the salsa: skin the tomatoes by pouring boiling water over them, leaving for 1 minute and then slipping off the skins. Halve each tomato, extract and discard the seeds, then chop the flesh finely. Chop the avocados into very small dice and do the same with the onion. Combine everything together, along with your finely-chopped red chilli, in a bowl, adding seasoning, lime juice (to taste), half the chopped coriander and a few drops of Tabasco.

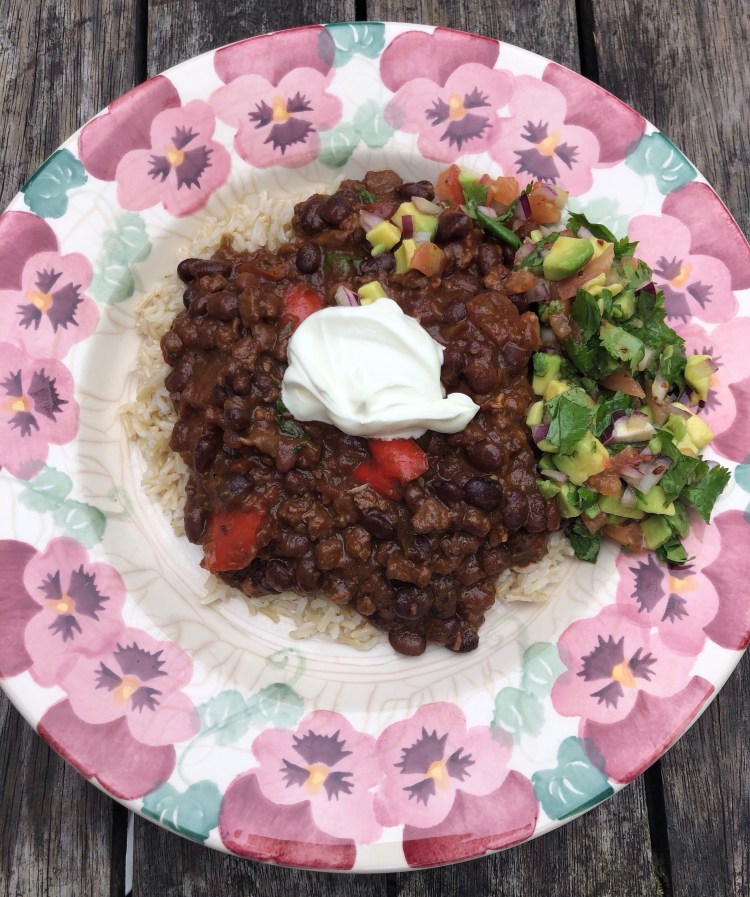
Before serving the chilli, add salt to taste. Stir in the rest of the coriander leaves and lime juice. Serve with rice, salsa and crème fraîche.

Pörkölt

The Hungarian word pörkölt simply means ‘roasted’ but it has evolved to refer to a meat stew, which in most parts of Hungary is made with beef or pork, with or without the addition of vegetables. Our family version, consisting of pork and mushrooms, is very much my own invention but nonetheless redolent of Hungary. Cheap and filling, it can be made in a slow cooker, or on the hob or in the oven and is a useful vehicle for using up leftover red wine. For a delicious vegetarian alternative, use a variety of mushrooms instead of the meat and bingo, you have a gombapörkölt.

Serves 6

Ingredients

900g lean diced pork
300g mushrooms, quartered
2 medium onions, finely chopped
2 tbsp vegetable, sunflower or groundnut oil
3 cloves garlic, finely chopped or minced
187ml small bottle red wine
200ml vegetable stock or water
1 tbsp flour
1 tsp paprika (csipős (spicy) or csemege (mild) according to preference)
2 tbsp piros arany (ditto)
½ tsp salt and a good grind of pepper
A small pot of soured cream

Method

Preheat the oven to 140 fan.

Heat the oil in a casserole pan for which you have a lid, then cook the onions for about 10 minutes, adding the garlic towards the end. Raise the heat, add all the meat and cook, stirring, until all the surfaces of the meat have turned opaque. Now add the mushrooms and cook, stirring, for another 5 minutes. Sprinkle in the flour, paprika, salt and pepper, add the piros arany and stir until everything is well coated and looking quite orange. (Note: go easy on the salt if you’re using piros arany, which is quite salty already.) Pour in the wine and stock or water and bring to a simmer. There may not look like a lot of liquid at this stage but the mushrooms will release water and you’ll be adding soured cream at the end. Put the lid on the pan and cook in the oven for about an hour and a half, or until the pork is really tender. In the meantime, make your cucumber salad (see below) and cook some rice.

Just before serving, stir in the soured cream. There’s no need to reheat.


Cucumber salad

Serves 8

Ingredients

2 large cucumbers
1-2 tsp salt
50 ml white wine vinegar
100 ml water
1 tbsp sugar
1-2 tbsp dill, chopped
½ tsp paprika
Soured cream or crème fraiche

Method

Peel the cucumbers and slice thinly (a mandolin or the slicing attachment of a food processor will speed this up).  Place cucumber slices in a colander, add salt, stir and leave to disgorge juices for an hour (ideally, but 30 mins will do).

Dissolve the sugar in a little boiling water, then add vinegar and taste: add more sugar if necessary; top up with cold water; chill.

Rinse the cucumber slices and transfer to a shallow serving bowl. Pour over the dressing and plop a little soured cream / crème fraiche in the middle. Sprinkle over paprika and chopped dill

Cheesy Leeks

This is so basic that it hardly warrants a whole post to itself, but no collection of family favourites would be complete without it. Cheesy leeks were created out of a need to disguise the vegetables accompanying Sunday roasts when you were small and fussy fussier. Cauliflower was never on the cards, that excellent vegetable having been ruined for your father by over-zealous boiling in the 1970s. So leeks it had to be: cheap, green and rendered palatable by a cheesy white sauce.

Serves 6 as a side

Ingredients

3 large leeks, trimmed, washed and cut into 5cm cylinders
25g butter
1 heaped tbsp flour
½ tsp mustard powder
200 ml milk
Salt, pepper & nutmeg
100g cheddar (or other strongly-flavoured hard cheese), grated coarsely
2 tbsp breadcrumbs (optional)

Method

Preheat the oven to 180 (fan), or just use the temperature at which you’re already cooking your roast. 

Arrange the leek cylinders standing upright in a steamer basket and steam for five minutes. If you don’t have a steamer, then you can just boil them instead but make sure you drain them thoroughly.

In a small pan make a roux: melt the butter, then turn up the heat and add the flour and the mustard powder. Whisk until the mixture becomes paler (do not allow to brown), then add the milk. Whisk vigorously and simmer for 8-10 minutes until it is thick and no longer tastes of flour. Season with salt, pepper and nutmeg, then turn off the heat and stir in two-thirds of the cheese.

Butter an oven-proof dish and arrange the leeks in it, lying on their sides. Pour over the cheesy sauce, then sprinkle over the breadcrumbs and finally the rest of the grated cheese. Bake in the oven for 25 minutes until brown on top.

Note: this is very versatile. You can cook it at a lower / higher temperature for longer / less time, and you can even grill it last minute if you don’t have room in the oven, although in that case I’d advise steaming the leeks for a couple of minutes longer to ensure that they’re soft enough to eat.

Crab mac ‘n’ cheese

In the book she published last year (Cook, Eat, Repeat) Nigella rails against “the insidious encroachment of the American appellation of mac ‘n’ cheese over here”, but then admits defeat and offers this take on an opulent, defiantly American pasta dish. We’ve eaten it twice, most memorably for lunch on Christmas Eve 2020, the plague year when Christmas was cancelled and we had to massage the rules in order to gather à six. Rich and comforting, it is elevated nursery food that should, in my opinion, be eaten in winter, en famille, with a green salad to offset the decadence.

Serves 4 generously

Ingredients

200g Gruyère, grated
2 tbsp freshly grated Parmesan
2 tbsp plain flour
½ tsp ground mace
½ tsp smoked paprika
¼ tsp Aleppo pepper, or hot smoked paprika, plus more to sprinkle at the end
500ml full fat milk
2 tbsp tomato purée
60g unsalted butter
400g conchiglie rigate pasta
200g mixed white and brown crabmeat (50/50)

Method

Combine the grated cheeses in a bowl. Mix the flour with the spices in a small cup. Pour the milk into a measuring jug and stir in the two tablespoons of tomato purée. Put a pan of water on to boil for the pasta.

In a heavy-based saucepan that will be large enough to hold all the pasta + sauce later, melt the butter over a lowish heat, then peel and mince or grate in the garlic and stir it around in the pan quickly. Turn the heat up to medium and add the flour and spices. Whisk over the heat until it all coheres into an orange, fragrant, loose paste; this will take no longer than a minute. Take off the heat and very gradually whisk in the tomatoey milk, until it’s completely smooth.

Put back on the heat, turn up to medium and cook, stirring, until it has thickened and lost any taste of flouriness; this will take up to 5 minutes. Stir in the Worcestershire sauce.

Take the pan off the heat and stir in the grated cheeses. Put a lid on the saucepan, or cover tightly with foil, and leave on the hob, but with the heat off, while you get on with the pasta.
Add salt to the boiling water in the pasta pan, then add the pasta and cook according to the packet instructions, though start checking it a couple of minutes earlier.

When the pasta is just about al dente, add the crabmeat to the smoky cheese sauce, then once you’re happy that the pasta shells are ready, drain them, reserving some pasta-cooking liquid first, and drop the shells in. Stir over a lowish heat until the crabmeat is hot. If you want to make the sauce any more fluid, add as much of the pasta-cooking water as you need. Taste to see if you want to add salt.

Serve sprinkled with Aleppo pepper or hot smoked paprika.

Pears in Marsala

Here’s another trusty old recipe from Delia Smith’s Winter Collection (see blinis, colcannon potatoes, mushroom risotto, hot citrus pudding, pumpkin soup). It’s a 70s classic that has stood the test of time, perhaps because as a fruit-based dish it offers a lighter alternative to the heavy sweetness of other traditional puddings. The original is made with red wine but Marsala has a more complex flavour, or you can save money by using strong dry cider instead. ‘Each version has its own particular charm,’ says Delia.

Serves 8

Ingredients

8 large hard pears
550ml Marsala
50g caster sugar
2 whole cinnamon sticks
1 vanilla pod
1 rounded dessertspoon arrowroot
500ml crème fraîche

Method

Preheat the oven to 130°C (110 fan).

Peel the pears, leaving the stalks intact, then slice off a thin disc from the base of each so they can sit upright. Lay the pears on their side in a large casserole dish, sprinkle over the sugar, pour in the Marsala and add the cinnamon sticks and vanilla pod.

Bring everything up to simmering point, then cover the casserole and bake the pears for about 1-1½ hours. Turn the pears onto their other side and return to the oven for a further 1-1½ hours. Cooking time will depend upon how hard your pears were to start with.

Transfer the pears to a serving bowl to cool, leaving the liquid in the casserole. Remove the cinnamon sticks and vanilla pod and place the casserole over direct heat. In a cup, mix the arrowroot with a little cold water to make a smooth paste. Whisk this into the casserole and bring the syrup just up to simmering point, so that it thickens slightly. Remove from the heat and when it is cool, spoon the syrup over the pears, basting them well.

Cover the pears with foil or clingfilm and put them in the fridge to chill thoroughly. Serve them sitting upright in individual dishes with the sauce spooned over and crème fraîche on the side.

Pumpkin soup

A chance encounter in Gunnersbury Park last month prompted the recording of this recipe. Running – or rather shuffling – along on my first Park Run since March 2020, I spotted a stall setting up for the fortnightly artisan market and returned to purchase four tea towels on my way home: you can see Kate Guy’s designs (all food and recipe-related) here. We discovered a shared enthusiasm and Kate invited me to contribute a seasonal soup recipe for illustration in her forthcoming calendar project. So here is Delia’s Roasted Pumpkin Soup with Melting Cheese, earmarked for October in Kate’s calendar because that’s when pumpkins are in plentiful supply. Rather than just carving an over-sized one for Hallowe’en, grab something a little smaller and make this soup or a pumpkin pie. Diced and grated cheese, and croûtons too, add body and variety of texture.

Serves 6

Ingredients

1 pumpkin, approx 1.6kg
1 tbsp groundnut oil
1 large onion, finely chopped
850ml vegetable or chicken stock
450ml whole milk
25g butter
Salt, pepper and nutmeg

To serve
110g Gruyère or Fontina, cut into 5mm dice
50g Gruyère or Fontina, coarsely grated
6 tsp crème fraîche
Croûtons (see below)
Flat-leaf parsley, chopped

Method

Pre-heat the oven to 240°C (220 fan).

Cut the pumpkin into eighths through the stalk and scoop out the seeds. Brush each section with oil and place on a baking sheet, season with salt and pepper and then roast for 25-30 minutes until tender. Remove from the oven and set aside to cool.

Melt the butter in a large saucepan, add the onion and cook gently for about 20 minutes, stirring occasionally. Add the stock and milk and bring slowly to simmering point. Scoop out the pumpkin flesh and add to the stock along with more salt and pepper and nutmeg. Simmer gently for 15-20 minutes.

Blend the soup to a purée in two batches and pass through a sieve to remove any fibrous bits. Taste and season well. When ready to serve, re-heat it gently just up to simmering point and stir in the diced cheese. Ladle into soup bowls, garnishing with a teaspoon of crème fraîche, grated cheese, croûtons and parsley.

Croûtons

75g bread cut into small cubes
1.5 tbsp olive oil
A little salt

Pre-heat the oven to 170 fan.

Put the cubes of bread in a bowl with the oil and a pinch of salt and stir to coat evenly. Arrange on a baking sheet and bake for 10 minutes or until they are crisp and golden. Be warned: you must use a timer because it is very easy to forget these and burn them. Allow to cool and leave aside until the soup is ready, or store them in a tin or jar.

Vegan apple pudding cake

Stretching the blog’s rules again, I’m recording this brilliant recipe because it’s hard to believe it is completely vegan. It comes from Meera Sodha’s column in the Guardian’s Saturday food supplement Feast, and I’ve made it three times this year – every time to astonished acclaim from family, friends and colleagues. It has enough apple in it to be potentially good for you, a crunchy brown sugar top and soft, puddingy insides.

Serves 8-10

Ingredients

For the apples

2 granny smith apples, peeled, cored and cut into 2cm cubes (175g prepared weight)
1½ tsp ground cinnamon
40g soft brown sugar

For the cake batter
200g self-raising flour
1½ tsp baking powder
½ tsp salt
160g soft brown sugar
120ml olive oil
1 tsp vanilla extract
100ml non-dairy milk
1 tbsp apple cider vinegar

For the top of the cake

2 granny smith apples, cored and sliced
1 tbsp soft brown sugar

Method

Heat the oven to 200C (180C fan)/390F/gas 6, and line a 20cm springform round cake tin with greaseproof paper.

In a medium bowl, mix the apple cubes with the cinnamon and brown sugar, and set aside.

Measure all the dry ingredients for the batter into a large bowl, stir to combine, then pour in the wet ingredients and beat until you have a smooth batter. Tip in the cubed apples and their sugary, cinnamony juices, stir to combine, then scrape the batter into the lined tin.

Fan the sliced apples in a circle to cover the top of the cake, sprinkle over the remaining soft brown sugar, then bake on the middle shelf of the oven for 50-60 minutes, until the cake has risen, the apples on top are golden and a skewer inserted into the centre comes out clean. Serve warm or cold.

Lentil rissoles

During my flirtation with vegetarianism in the early 1990s I learned to make these by experimenting with a recipe from a cookbook in Granny’s impressive collection (I think it was in the Sainsbury’s vegetarian food paperback). The Hungarian paprika flavouring has crept in because we’re often faced with a glut of piros arany, which Babú brings back in suitcase-loads from Hungary, along with csipős zöld paprika, bonfire cheese, Hungarian mayonnaise, pálinka and beigli. Piros arany – either csipős (spicy) or csemege (mild) – is a key ingredient in our bográcsgulyás and pörkölt and it really isn’t essential in these rissoles but they are, frankly, otherwise a bit bland. You could probably achieve a similar effect with Korean gochujang paste, which has become easier to source since Nigella plugged it on TV last year.

Makes 6-8 rissoles

Ingredients
1 onion, finely chopped
1 carrot, peeled and diced
1 stick celery, diced
90ml light olive or groundnut oil
250g green lentils
600ml vegetable or chicken stock
1.5 tbsp piros arany (csipős or csemege) or gochujang paste or similar
2 bay leaves
2 bunches of thyme
Salt and pepper
2 tbsp chopped parsley
200g breadcrumbs
50g seasoned flour
2 eggs

Method

Heat 2 tbsp oil in a heavy saucepan and cook the onion, carrot and celery on a low-medium heat for about 8 minutes until soft. Add the lentils, stir to coat in the vegetable mix, and then add the stock, piros arany, bay leaves and thyme. Bring to a boil, then cover, turn the heat down and simmer for 40 minutes until the lentils are soft and starting to collapse. Check and stir from time to time: add a little more stock or water if it’s starting to dry out, but be careful not to make it too sloppy because you’ll struggle to shape any rissoles from it! Once the lentils are cooked, remove the bay leaves and thyme and stir in salt, pepper, parsley and 50g breadcrumbs to firm up the consistency. Leave to cool with the lid off until you can handle it with your bare hands: at least 1 hour.

Set up your assembly line: put the flour in one bowl, whisk the eggs in a second, then put the remaining breadcrumbs in a third. Shape the lentil mixture into large round patties and coat each in flour, egg and breadcrumbs in turn. If you need to firm the rissoles up and have time, refrigerate for half an hour or more.

Heat the rest of the oil in a large frying pan and cook the rissoles on a medium heat until browned on both sides and hot all the way through. Finish off in the oven (160 fan) if you’ve chilled them before cooking and suspect they might still be cooler in the middle. Serve with tsatsiki or any sauce of your choice.

Grilled pepper salad

This is very much a family invention and therefore open to as much variation as you like. It’s a colourful accompaniment to a summer barbecue and can be made well in advance. Just save the addition of the basil until just before serving. Red and yellow peppers are easier to peel than green ones (which are simply unripe versions of their primary-coloured counterparts) and they’re sweeter too, but if you’re after more variegation use as many colours as you like.

No basil in the fridge, so oregano was used here instead

Serves 6 as a side

Ingredients

2 yellow peppers
2 red peppers
2 fat cloves of garlic, crushed or minced
3 tbsp extra virgin olive oil
1 tbsp balsamic vinegar
Salt and pepper
A handful of basil leaves, torn or shredded.

Method

Heat your grill on its highest setting.

Slice the base off each pepper, remove the core, then cut the body into quarters or thirds, according to its natural segments, and shave off the white parts and the seeds. Arrange each pepper segment on the grill pan and grill until dark and blistered all over. Remove from the grill, cover with a tea towel and leave the skins to loosen, until the flesh is cool enough to handle.

Peel each piece of pepper and then slice into strips. Arrange in a serving dish, scatter over the garlic, slosh over the olive oil and balsamic vinegar and season with salt and pepper. Give it all a stir and taste to check the seasoning. Just before serving, stir in half the basil leaves and scatter the rest on top.

Strawberry Truffles

Before this year, I had only tried my hand at truffles once: they were (allegedly) Earl Grey flavoured and, frankly, a bit meh. Then your father gave me a terrific little book called Amaze Balls full of sweet and savoury recipes for round, bite-sized snacks. The strawberry truffles (or my raspberry variation) have proved a real hit at parties and they make great presents too. 

Makes approximately 30 balls

Ingredients

For the truffles:
150 thick double cream
25g unsalted butter
2 tbsp strawberry or raspberry liqueur (Chambord is recommended)
150g dark chocolate (70-75 % cocoa)
1 tbsp Greek yoghurt

For the coating:
Raw cacao powder
Freeze-dried strawberry or raspberry pieces

Method

Put the cream, butter and liqueur in a small saucepan and slowly bring to a simmer.

Blitz the chocolate in a food processor and, with it still running, slowly pour the cream mixture onto the chocolate and keep blending until the mixture is smooth. Add the Greek yoghurt and blend briefly to combine.

Transfer to a clean bowl and cover with cling film; it will be quite runny and will need to set in the fridge for 6 hours or overnight.

Remove the truffle mixture from the fridge and dust your hands with cacao powder. Then take teaspoons of the mixture and roll them into balls before coating them with the freeze-dried strawberries. If you run out of the latter (easily done – as evident from the pictures above), just roll the balls in cacao powder: they’ll still look and taste great. Chill again for an hour before serving.

These will last for at least 7 days in the fridge.